
How a mainsail is held to the mast and to the boom. This is the part of the sail that has to match hardware already fitted, so most of this page is about what has to be established before the sail can be drawn.
Nothing on this page is a styling choice. It records the interfaces already fitted to the boat and the installation dimensions needed to make the new sail meet them.
The luff: two systems
A mainsail luff is held to the mast in one of two ways. Your boat already has one of them, and a sail built for one cannot be used with the other.
Bolt rope
A rope is sewn into the luff along its whole length, and it runs inside a groove in the back of the mast.
What has to be established: the rope size, matched to the groove. A rope too small pulls out of the groove under load; one too large will not run. If the existing sail works, its rope size is the answer.
What it means in use: the rope is continuous, so the sail can only enter or leave the groove at the gate. Dropping the sail means feeding the entire luff back down and out. Even if the sail is then tied onto the boom, it has come off the mast first.
Slides and cars
Instead of a continuous rope, the luff carries separate fittings — slides running in the mast groove, or cars running on a track. There are several shapes, and the shape has to match the groove or track it runs in.
Owners choose them for two reasons:
They run more freely. A rope is in continuous contact along its whole length and its friction rises as the sail loads up — which is why a bolt-rope main can hoist easily at the dock and resist coming down when it is blowing. Separate fittings touch only at intervals, and the better ones run on rollers.
The sail stays on the mast. This is the practical difference. Lower the sail and it flakes down onto the boom with every fitting still in its track, ready to hoist again. Nothing is threaded or unthreaded.
Slides can usually be pulled out of the groove if the sail has to come off entirely. Cars often cannot — many are captive in their track and stay there permanently. That is not a limitation, because the sail is not meant to come off.
Full battens are hard-connected to the mast
A short batten sits in its pocket and needs nothing at its forward end. A full batten is different: its forward end is mechanically connected to the mast, so that the batten is held rather than floating.
The chain is: the batten sits in a receptacle at the front of its pocket, and the receptacle connects to a car on the mast track. Cars for full battens normally run on rollers, because they are carrying a batten that is being pushed forward into them.
There are two ways the receptacle meets the car:
A threaded fitting, which is the common one. The receptacle screws onto a stud on the car. This is the case where we need the diameter of that thread — the car model tells us the rest.
A plain slide, on some boats, where the batten connects through an ordinary fitting rather than a screw. This works and it is less common.
What comes with the sail, and what stays on your mast
This follows directly from the above, and it is the thing most often misunderstood when a sail is replaced.
The cars stay on the mast. They were bought with the boat or with a track upgrade, they will outlast several sails, and on many boats they cannot be removed anyway. Changing sails does not change the cars.
The sail we build carries the parts that meet them: the receptacle at the front of each full batten, the batten itself, the rings and webbing that connect each plain slide, and the reinforcement behind all of it.
So the sail is built with its connection points in the positions your cars already occupy. Get those positions wrong and the sail is finished, correct, and unusable.
What you have to tell us
Four things, and they all come from the mast rather than from preference.
The thread diameter, where the batten receptacles screw onto the cars, together with the car model.
How many full battens. On a boat with batten cars already fitted, this is not a free choice — the number of full battens is the number of cars on the mast. Count them.
How many plain slides sit between the battens, and where. Usually one or two between each pair of full battens, and the count has to be exact.
How each plain slide connects to the sail — a press ring with webbing through it, a press ring with a plastic connector, or webbing sewn directly to the sail. This is determined by the slides and cars you have, not chosen. Where webbing is used, we need its width.
The reliable way to record all four is to walk down the luff from the head and write down what is at each position: the head fitting, each full batten, the plain slides in between, anything near a reef, and the tack. A model number alone will get the common positions right and miss the exceptions — a batten position without a car, a special slide near a reef, a car replaced after a failure that does not match its neighbours.
The fitting nearest the headboard is worth a photograph of its own. It carries the highest load on the luff and it is frequently a different part from everything below it.
How each slide attaches to the sail
There is no single answer, and this is one of the things that has to be taken from the sail being replaced rather than assumed.
The common arrangements are:
A press ring in the luff, with webbing through it to the slide. The ring spreads the load into the sail and the webbing makes the connection.
A press ring with a plastic connector instead of webbing.
Webbing sewn directly to the sail, with no ring.
Which one your sail uses affects how the slide sits, how far the luff stands off the track, and how freely everything runs. It is determined by the slides and cars you already have, not chosen — so photograph one connection made up and one taken apart, and note the webbing width where webbing is used.
The foot: loose-footed, or in the boom groove
The same question along the bottom edge, with fewer answers.
Loose-footed means the sail attaches to the boom only at the tack and the clew, and the foot itself flies free. It is the more common arrangement on modern mainsails, it makes the outhaul more effective, and it leaves nothing along the boom to interfere with reefing lines or a cradle.
Bolt rope in the boom groove means the foot carries a rope running in a groove along the top of the boom, holding the foot down along its whole length.
The choice is set by the boom you already have. Loose-footed does not make the clew simpler — the clew slide, shackle, strap or outhaul car still has to fit the boom’s fittings and have room to work.
The head fitting: slides and head cars
Like the batten cars, the head fitting is not chosen for the sail — it has to match what is already installed on the mast. The headboard carries the highest combined halyard and leech load on the entire luff.
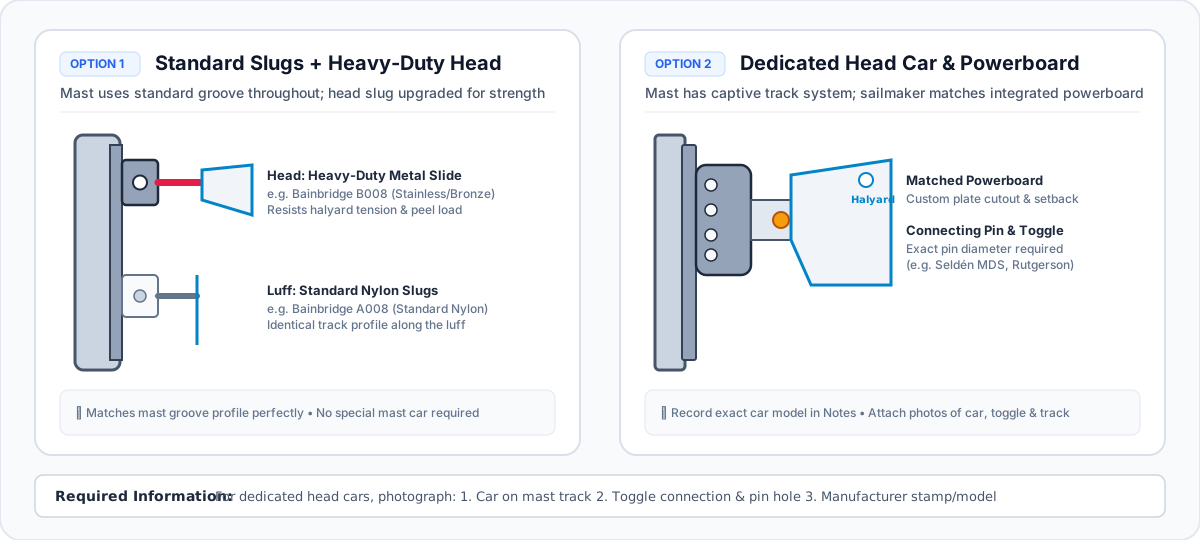
There are two distinct arrangements:
1. Standard slugs with a heavy-duty metal head slide
Where the mast uses standard slides along the whole luff, the fitting at the head takes the greatest strain.
The head slide must match the track profile of all the lower slides, but it is upgraded to an all-metal or heavy-duty version to withstand high halyard tension and prevent peel failure (for example, using standard nylon Bainbridge A-series slugs along the luff, but fitting a matching all-metal Bainbridge B-series stainless steel slide at the headboard position).
2. Dedicated head cars and matched powerboards
Boats with captive track systems have a dedicated head car mounted permanently on the mast.
In these installations, the head car and the sail’s powerboard (headboard plate) form an integrated matching system. The sailmaker does not supply a generic headboard: the plate profile, toggle geometry, pin diameter, and halyard attachment setback must match the specific car system (such as Rutgerson, Seldén MDS, or Ronstan).
What we need if your mast has a dedicated head car
- The exact car manufacturer and model number, confirming the matched powerboard system.
- Clear photos:
- The head car engaged in the mast track.
- The toggle, pin hole, and connection point to the headboard.
- Upload these photos to the design attachments and record the hardware model and pin dimensions in the Design Notes.
Tack and clew
The tack sits in the most crowded part of the boat: the gooseneck, tack pin, reef hook, vang attachment, cunningham, cover and mast gate may all occupy the same few hundred millimetres. The clew has the same obligation at the other end of the boom: its slide, car, shackle or strap has to meet the outhaul and remain free to rotate without fouling the boom or cover.
Installation dimensions
The theoretical tack is where the luff and foot would meet. The actual fitting is offset aft and up so it clears the gooseneck. The clew has an equivalent vertical clearance. These are installation dimensions taken from the boat, not proportions of the sail and not styling.
The most reliable source is a photograph of the gooseneck with fixed mast and boom faces visible and a ruler in frame. The practical measuring route and diagram are in Dimensions and Fit.
Configuring this at SurgeSails
Luff Attachment Type identifies bolt rope or slides and cars, and the fields that follow depend on it: Bolt Rope Size on one path, Slide / Car Model, Luff Rope and Luff Stand-Off on the other. Where the sail has full battens, Batten Car and Luff Receptacle appear. Foot Attachment Type works the same way. Head Slide / Car, Tack Slide / Car, Clew Slide and the relevant cut-up and cut-back dimensions describe the three end interfaces.
These are among the very few fields on a mainsail with no default value, because they can only come from the hardware already on your mast.
The slide count, the connection method and the thread diameter do not all have fields — send them as photographs and notes. If you cannot identify a part, select Custom Install rather than the closest-looking option, and the connection is built to your photographs.