
The configurator starts with the dimensions and fit information already held against the boat. Confirm that record where it still describes the boat; otherwise use a mainsail that fits, or measure the boat when there is no sail to copy.
Start with the system record
The boat selection may already supply Rig P, Rig E, previous finished sail dimensions, the mainsail type and known mast or boom hardware. A previous order, Sail Passport or signed measurement report is stronger evidence than a generic model record.
Confirm that the record describes what is still fitted to this boat. If the mast, boom, track or furling system has changed, mark the affected values for review rather than confirming them because the boat name is right.
Then choose one route:
| If you have | Follow |
|---|---|
| A verified record or previous report that still matches the boat | Route 0 — confirm the record and upload the evidence |
| An existing mainsail that fits | Route A — measure the sail |
| No usable mainsail to copy | Route B — measure the boat |
The mainsail type must already be confirmed before these routes. If it is not clear, one side-on photograph of the whole mast and boom will normally settle whether the boat has a standard, in-mast or in-boom system.
If the old sail is known not to fit, say what is wrong with it. Do not silently copy the problem into the new sail.
Route A — measure the existing sail
An existing sail that fits is the best reference because it already accounts for the mast track, head and tack clearances, clew position and available halyard travel.
Lay the sail flat on a clean surface. Straighten each edge and apply only enough tension to remove wrinkles; do not stretch the cloth. Photograph the tape at both endpoints and record the unit.
The required dimensions
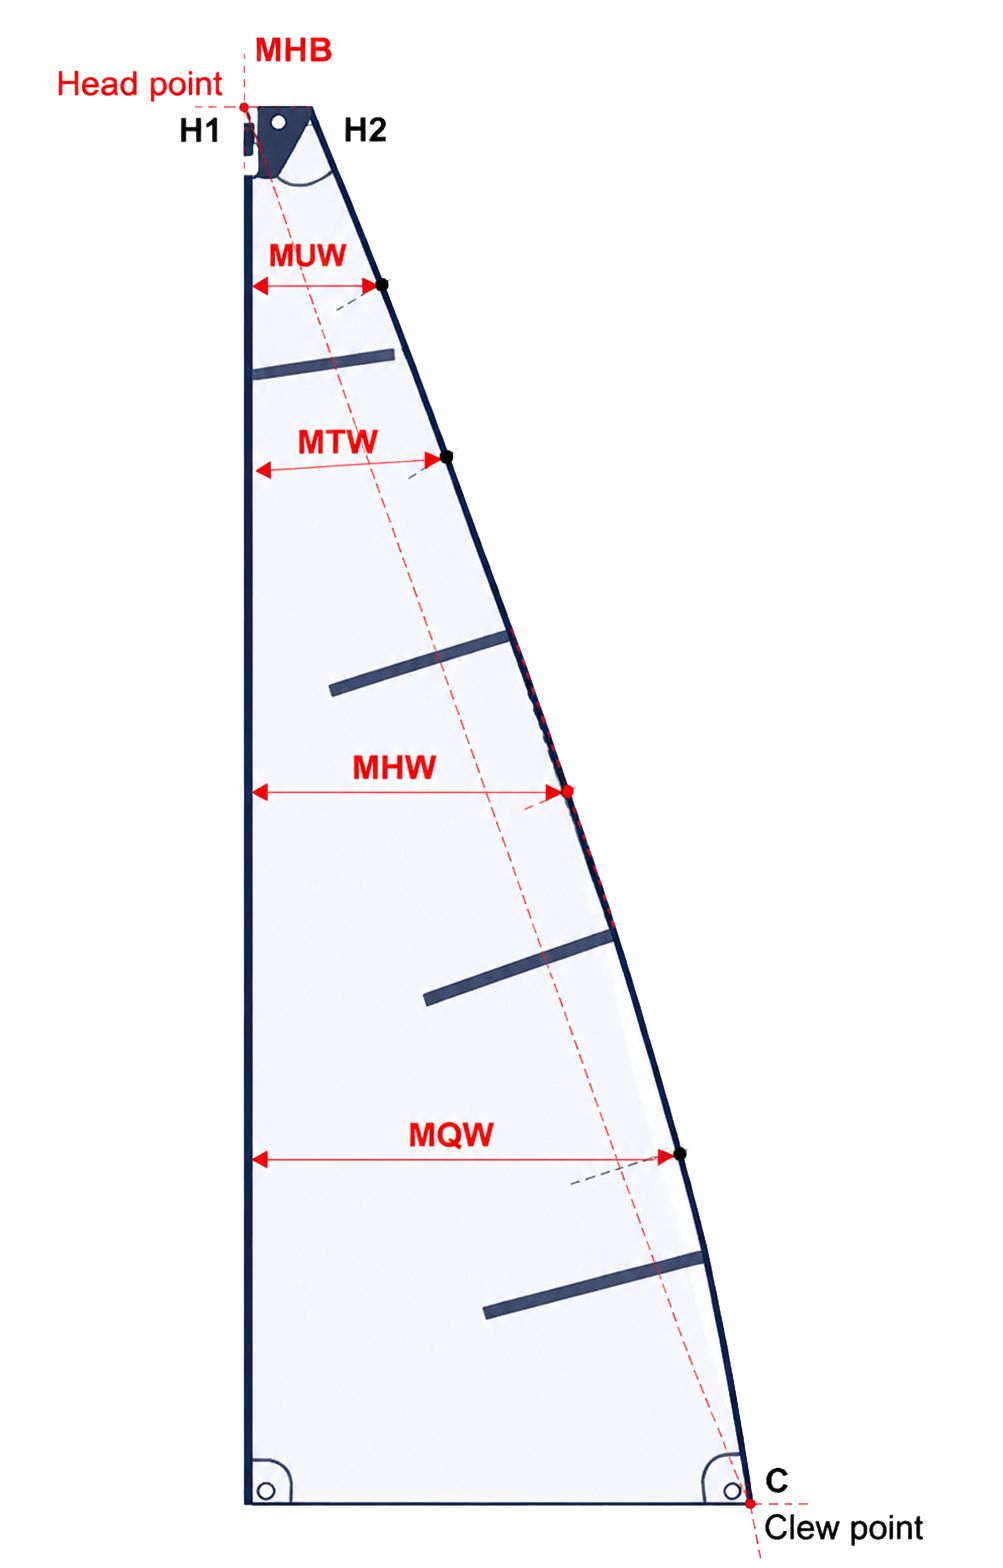
- Luff — the full finished luff length, from the tack point to the head point.
- Leech — from the head point to the clew point.
- Foot — from the tack point to the clew point.
- Head / MHB — the finished width across the head.
- H1 and H2 — where the sail has a headboard, record its luff-side and leech-side heights as shown, then photograph both faces, the holes and its connection to the head slide or car.
For a more exact reproduction or a rated sail, also record the girths shown below: MUW, MTW, MHW and MQW. These describe the actual roach and should come from the measurement report when one exists rather than from guessed positions on the sail.
Send the previous report and overall photographs
If the sail or boat has been measured before, photograph or scan the complete sail specification, rating certificate or measurement report. Include the title and boat details, not only the row of numbers, so the report can be matched to the correct sail.
Take an overall photograph of the complete sail laid out flat, preferably from both faces. It should make the following visible:
- the number and approximate positions of reef rows;
- sail numbers, class insignia and other markings;
- batten layout and any unusual reinforcement;
- visible wear, repairs or distortion.
Photograph anything that will be reused
If the new sail will use the same slides or cars, photograph one ordinary luff slide or car in the mast track, then close up from the front and side. Include any manufacturer name or part number and a ruler for scale. Where the part disconnects, show it assembled and apart.
Also send close photographs of:
- the head, including the headboard and head slide/car if fitted;
- the tack, including its fitting and any tack slide/car;
- the clew, including the clew slide, car, shackle or strap;
- each full-batten car and its connection, if the sail has full battens.
Route B — measure the boat when there is no sail
Start with a side-on photograph of the complete boat with the mast and boom visible. This gives every later close-up an orientation and shows the overall rig arrangement.
Establish the available luff and foot
Measure the available hoist on the mast and the available foot along the boom using the endpoints agreed during review. These are the boat’s limits, commonly recorded as P and E; they are not automatically the finished Luff and Foot because the head, tack, clew and their clearances occupy part of that space.
Photograph both endpoints of every measurement. Record how the tape was hoisted, where the boom was positioned and whether the halyard was tensioned. Use a non-stretch tape and a retrieval line.
Record the gooseneck clearances
The gooseneck is the most important close-up when there is no old sail. Photograph it from the side and slightly above with a ruler in frame. The image must show the mast aft face, top of the boom, tack fitting, reef hook or horn and the clear space around them.
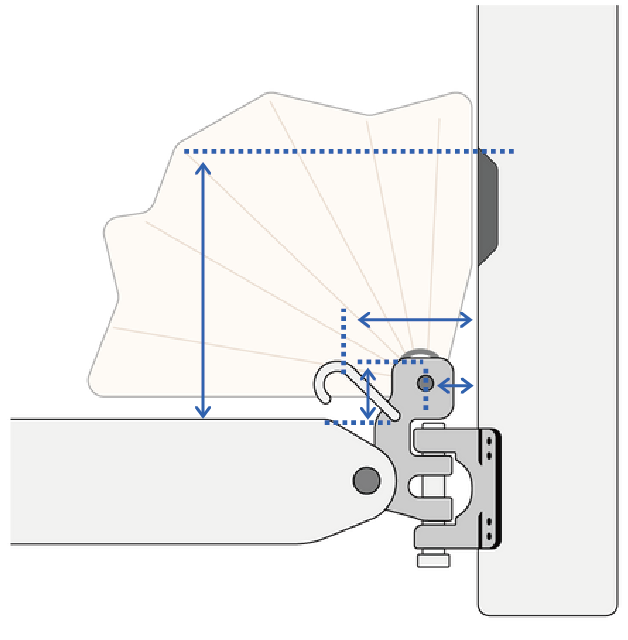
These clearances establish where the finished tack can sit without fouling the gooseneck or reef hardware. If a stack pack, cradle or cover occupies the same area, include it in the photograph.
Identify the luff attachment and its stand-off
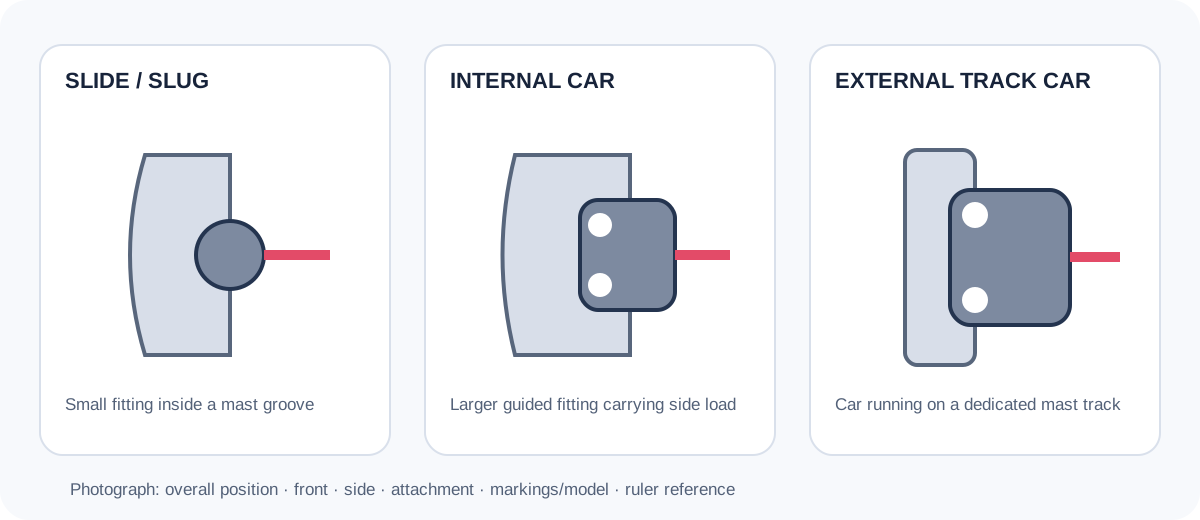
Photograph the mast groove or external track looking up from the gate. Then photograph the slide or car that will run in it:
- show the manufacturer and part number if they are marked;
- show the fitting fully installed in the track;
- measure the Luff Stand-Off from the mast aft face to the finished sail luff edge with the slide or car installed;
- if a full-batten car uses a threaded stud, record the car model and thread diameter;
- if the luff uses a bolt rope, measure the working groove and identify the finished bolt-rope size instead.
Record the head, tack and clew interfaces
At the head, photograph the top of the track and any permanent head car. A permanent head car needs its model plus photographs of the connection and available headboard space.
At the tack, photograph the fitting, reef hooks and any tack slide/car. At the clew, photograph the outhaul connection and say whether there is a clew slide in the boom track; if there is, identify its model and measure the working connection or strap length with a ruler in frame.
Photograph the whole boom from the side, including the clew and outhaul and where each reefing line exits. Say whether the foot will be loose or will use a bolt rope in the boom groove.
Furling-system additions
In-boom furling: send the boom manufacturer’s drawing and dimensional data for this boat. This is mandatory; the sail cannot be built from general rig dimensions alone. If the drawing is unavailable, send the boom make, model and size so it can be requested.
In-mast furling: send the furler make and model plus photographs with the sail or system partly rolled so the roll direction is clear.
For either system, describe any point where the previous sail jammed or rolled unevenly.
Photographing rules for both routes
- Put a ruler or tape in every hardware close-up.
- Take an in-position photograph before the close-up.
- Photograph a connection assembled and apart where possible.
- Do not guess a model from appearance; photograph the stamped name or number.
- If a measurement endpoint is unclear, photograph it and ask rather than choosing one.
How this differs from Size, Roach and Shape
This page is the practical collection checklist: what to measure and photograph. Size, Roach and Shape is the advanced explanation of how P, E, the finished edge lengths, MHB and the girths affect the designed outline, roach and area. The pages use the same dimensions for different jobs and do not replace one another.
Configuring this at SurgeSails
Enter the finished Luff, Leech, Foot and Head from Route A when a suitable sail exists. Add MUW, MTW, MHW and MQW in Pro view when they are known from a report or careful measurement.
For Route B, enter Rig P and Rig E as boat references and provide the photographs and installation dimensions used to establish the finished sail. The attachment fields include Luff Attachment Type, Slide / Car Model, Luff Stand-Off, Head Slide / Car, Tack Slide / Car and Clew Slide.
If a component cannot be identified, select Custom Install where offered and upload the photographs. Do not choose the closest-looking part.